Everyone knows that the sound of your vocal recording is the MOST important piece of your song. If you have a great track with crappy vocals, people will not digg. Turn that around...you have a whatever track but amazing vocals and people will still listen. A lot of home recording projects have trouble getting that tight sound you get in big studios simply because the average room is probably one of the worst places to record acoustically.
One of the WORST materials for acoustic treatment is tile. And guess what, my entire floor is TILE! So when people sing in my home studio, the vocals are bouncing everywhere. To add to the problem, there's some computer hum, and it gets hot with the windows closed.
What to do, what to do!??? I needed a vocal booth, plain and simple. So, I ended up doing a lot of research on different ideas. I ran through all sorts of ideas...using a room divider, building one out of plywood, or even spending $300 dollars on the se Reflexion Filter.
Now from what I've heard, the se Reflexion Filter is great. People swear by it. However, after doing my research on it, here are the cons:
1. The price is a whopping $300.
2. It's heavy. Really heavy. In fact, you have to use a weighted mic stand and some people even have to put weights on the bottom of their weighted mic stand to keep this thing stable.
I needed something better. And better I found. Read on.
One of the sites I came across was the inspiration for my design. Harlan Hogan's site basically talks about how he discovered that in order to get a clean recording, the singer doesn't need to be in a treated acoustic space, only the microphone need be! That right there folks, is BRILLIANT. Here's his design:
The basic materials you need are:
1. Whitmore Cube (you can buy this at Target)
2. Acoustic Foam (the triangular kind, it is superior to the other types of acoustic foam)
3. Serated Knife to cut the foam.
Ok, now if you are a broadcaster, this is absolutely perfect. However, if you are in the business of recording singers, rappers, etc...this will not suffice. I needed this to work for a microphone boom stand. Here's what I came up with:
LET ME JUST SAY THIS THING IS LEGIT!!! I basically had to go to Lowe's and brainstorm like it was nobody's business. I did however make a few modifications to the original design. So, without further wait....here's how to make this bad boy.
MATERIALS
- Whitmore Cube
- Acoustic Foam
- Microphone boomstand
- 4 x 32' rods with screw grooves (you can buy these at lowe's)
- 1 bag of 8-32 hex nuts
- 1 bag of #8 washers
- Adjustable hose clamp
- Good scissors
- Sharp Knife with pointy tip
- Serated Knife for cutting acoustic foam
- Screwdriver
- Two Pins (can be any kind as long as they are at least 2.5 inches long)
INSTRUCTIONS
1. Get the Whitmore cube and the acoustic foam as described in Harlan's website.
2. Use a sharp scissor to cut a line down the middle of the bottom side of the cube and a little rectangle in the center to allow for the cube to slide over the microphone stand like so:
3. Use the tip of a sharp knife to poke a small hole in each of the four corners of the cube. Take each of the 4 rods and use one washer and one nut and screw it down the rod about 1 - 1.5 inches from the top. Poke the prepared rods into each of the holes and screw the another washer and nut from the inside of cube to secure the rod.
4. Slide the box over the microphone stand and hold the bottom of each of the 4 rods onto the bottom half of the microphone stand. Use the hose clamp and screwdriver to secure them together.
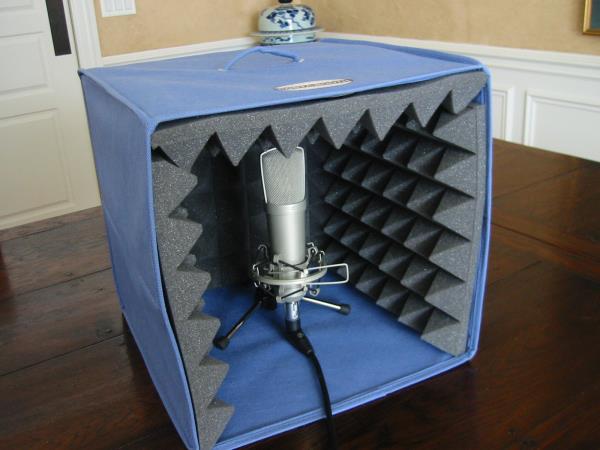
5. Now, for the acoustic treatment. One modification I made is that instead of cutting 3 squares for the two sides and the back, cut one long piece to curve around from one side to the other side. This is to somewhat emulate the shape of the se Reflexion filter. I noticed that when there was too much room in the cube, the sound becomes a little too boomy. Then, fill in the top and bottom with triangular shaped pieces to fill in the gaps. The top part is tricky and I simply used push pins to hold them to the top. There are much better ways to do this part, but this is what I had laying around the home! This is how it should look:
6. Get your beautiful microphone all warm and cozy in this bad boy. Here's my AT4033Cl sipping on a margarita in the foam kingdom.
And there you have it, folks. Cheapest and most effective vocal booth for the home without spending thousands of precious moola on a real vocal booth.
Now you are all wondering, "what does thing thing sound like!???". I know. So, I did a little vocal snippet of a song I was jamming to while making this thing, "Mrs. Officer". Holla back. Keep in mind what I told you about how my room sounds, computer noise, my window wide open, etc. To make things even worst, two cars even drove by my window while I was recording this! But it STILL sounds good :) Enjoy.
Ever wonder how to get that glitchy, chopped and skrewed sound? Here's a fun and FREE way to do it. Glitch VST, is a free VST that I highly recommend for your studio. It's a cool plugin that let's you add real-time effects to the audio as it plays.
I've messed around with Glitch VST and its pretty fun. It can be a little tricky at first however. Basically, you add Glitch onto an audio track as an insert effect. When the track audio plays, Glitch will loop through an effects pattern that you can modify as you wish and change the audio real time. You can then use the envelope on the track to turn it ON/OFF during certain parts of the track.
Some of the obvious purposes...creating cool drum and vocal effects. The imagination is the limit. You can get Glitch VST at:
Here's some pics from hanging out at the Mad Labs Studio in Hollywood, CA last tuesday night. Kickin it with Mack, some other producers, songwriters, and upcoming female duo "Sweet Rush." PLUS...a REAL rhodes.
I know a decent bit about mixing, but I like to turn to other producers and engineers for advice. If you have ever been sitting in the studio, frustrated with your mix (like I do), here's a little article I found on mixing tips from the pros.
Lately, I ran into a problem mixing 808 Kicks with a strong bassline. The problem is that the frequencies are all in the low-end spectrum. Without careful attention, this causes clashing between the bass and kick drum. I found that putting a limiter/compressor on the 808 kick and cutting everything but the low frequencies and eq'ing the bass a little higher than normal seemed to work well for me.
This is an interview of Jason Goldstein, the mixing engineer for some of Beyonce's recent hits. Here he talks about how he mixed everything from the vocals, 808 kicks, bass, and more. I found it extremely useful.
I just got a new guitar, the Godin LGX, and I'm happier than Michael Jackson inside a pre-school. (Sorry MJ, you're still the man!). It's a beautiful piece of work and sounds like cheddahh.
What are Godin guitars?? Don't worry, many people are unaware of them. Godin guitars are a rare gem in the guitar world that offer exceptional quality, craftsmanship, and originality for musicians at an unbeatable value. My first guitar teacher owned a Godin and ever since my first lesson (YEARS ago) I've been determined to own one of them. Here's a little review and information on the Godin LGX.
why the lgx?
This guitar is the ultimate versatile instrument. The incredible part is that it features a 2-Voice technology. One is the exceptionally clean electric output produced by the custom humbucker pickups. The other is an acoustic output that's produced by the L.R. Baggs saddle pickup. This makes your electric guitar sound frighteningly close to a real acoustic guitar. You can use them separately or together along with the 5-way switch to produce a large palette of sounds.
construction
The body is made of mahagony and capped with a maple carved top. The neck is made of honduras mahogany which is typically a wood of choice for quality acoustic instruments. My favorite part is the blue flame. The finish is hot as Megan Fox. Oww!
pickups
Even if you can't play to save your life, pluck a few notes. You'll be an instant rockstar. Each note is crystal clear with warm and crisp tones. Using the different combinations of the acoustic, electric, and 5-way switch, I found myself in a playground of sound that will be useful for both live and recording applications. I've already begun recording some music with this bad boy and the other guitars I've used in the past aren't even in the same league.
I'll be sure to post something that I've used my new guitar in soon. However, I will be in Spain starting on Friday. So it will have to wait until I return from the land of tapas and siestas. Until then, here are some pictures of my new axe. Enjoy.
After all the recording I've done, I still find it a major pain in the you know what to get a solid recording of an acoustic guitar. For one, acoustic guitars all have different tones and overtones. Some are bright, some are warm, some are dull, some are boomy, some are dry, some are resonant, and some are a weird combination of the fore-mentioned qualities. That said, here are some basic tips that I recommend for recording acoustic guitar. Each section also contains some bang-for-the-buck products that sound great but won't kill ya' stash.
Guitar Body: I have personally found that a nice wooden body top (spruce, ash) will get you the best tone. I'm currently recording with a full mahogany electro-acoustic body which sounds great live, but can lack that resonance that adds that extra character when recording. Of course, this is all preference and each guitar can add the right (or wrong) texture to your mix depending on the type of track you are doing. I'm just talking about in general...
Strings: I know many of you guitar players out there love your standard elixir strings. They sound great. However, for recording acoustic guitar I would recommend using bronze acoustic strings. Elixir also makes a nice bronze string set but you can pick up a nice pair of Martin bronze acoustic strings that will also do just fine. The point being, that you want to capture all the bright tones in addition to the warm tones. This will help the guitar cut through the mix. PERSONAL TRICK: Sometimes I use electric guitar strings on my acoustic. Put some coated D'Addario DX strings on there and you will be amazed at how bright your guitar will sound.
Microphone: Ah ha! Here is the tricky part. So how exactly do you record with the microphone? Well IDEALLY if you have a mixer, you should use two microphones. But dont fret (I'm so clever), you can still get away with using a single microphone.
- Two Mic Setup Place a condenser microphone around the neck area of the guitar to capture the higher tones and finger noise. Then, place a second dynamic microphone around where the neck meets the body to capture the middle and bottom tones. This will give you the most control on shaping the sound to fit your mix.
- Single Mic Setup You don't have a mixer, you say? Ok, well that's fine. If you have to use only one microphone, I recommend using the dymanic microphone. Place the dynamic microphone in the same position but slightly higher at the bottom of the neck.
Regardless of the setup you choose, you want to have about 6 inches separating the microphone and the guitar. And ALWAYS, use a preamp!!!
Mixing: I'm not going to go into too much detail here because this topic is too broad. But generally, you want to add a little reverb, light compression, and reduce some of the lower frequencies to come out with a nice clean sound.


 I've messed around with Glitch VST and its pretty fun. It can be a little tricky at first however. Basically, you add Glitch onto an audio track as an insert effect. When the track audio plays, Glitch will loop through an effects pattern that you can modify as you wish and change the audio real time. You can then use the envelope on the track to turn it ON/OFF during certain parts of the track.


