
One of the WORST materials for acoustic treatment is tile. And guess what, my entire floor is TILE! So when people sing in my home studio, the vocals are bouncing everywhere. To add to the problem, there's some computer hum, and it gets hot with the windows closed.
What to do, what to do!??? I needed a vocal booth, plain and simple. So, I ended up doing a lot of research on different ideas. I ran through all sorts of ideas...using a room divider, building one out of plywood, or even spending $300 dollars on the se Reflexion Filter.
Now from what I've heard, the se Reflexion Filter is great. People swear by it. However, after doing my research on it, here are the cons:
1. The price is a whopping $300.
2. It's heavy. Really heavy. In fact, you have to use a weighted mic stand and some people even have to put weights on the bottom of their weighted mic stand to keep this thing stable.
I needed something better. And better I found. Read on.
One of the sites I came across was the inspiration for my design. Harlan Hogan's site basically talks about how he discovered that in order to get a clean recording, the singer doesn't need to be in a treated acoustic space, only the microphone need be! That right there folks, is BRILLIANT. Here's his design:
The basic materials you need are:
1. Whitmore Cube (you can buy this at Target)
2. Acoustic Foam (the triangular kind, it is superior to the other types of acoustic foam)
3. Serated Knife to cut the foam.
Ok, now if you are a broadcaster, this is absolutely perfect. However, if you are in the business of recording singers, rappers, etc...this will not suffice. I needed this to work for a microphone boom stand. Here's what I came up with:

LET ME JUST SAY THIS THING IS LEGIT!!! I basically had to go to Lowe's and brainstorm like it was nobody's business. I did however make a few modifications to the original design. So, without further wait....here's how to make this bad boy.
MATERIALS
- Whitmore Cube
- Acoustic Foam
- Microphone boomstand
- 4 x 32' rods with screw grooves (you can buy these at lowe's)
- 1 bag of 8-32 hex nuts
- 1 bag of #8 washers
- Adjustable hose clamp
- Good scissors
- Sharp Knife with pointy tip
- Serated Knife for cutting acoustic foam
- Screwdriver
- Two Pins (can be any kind as long as they are at least 2.5 inches long)
INSTRUCTIONS
1. Get the Whitmore cube and the acoustic foam as described in Harlan's website.
2. Use a sharp scissor to cut a line down the middle of the bottom side of the cube and a little rectangle in the center to allow for the cube to slide over the microphone stand like so:


3. Use the tip of a sharp knife to poke a small hole in each of the four corners of the cube. Take each of the 4 rods and use one washer and one nut and screw it down the rod about 1 - 1.5 inches from the top. Poke the prepared rods into each of the holes and screw the another washer and nut from the inside of cube to secure the rod.


4. Slide the box over the microphone stand and hold the bottom of each of the 4 rods onto the bottom half of the microphone stand. Use the hose clamp and screwdriver to secure them together.

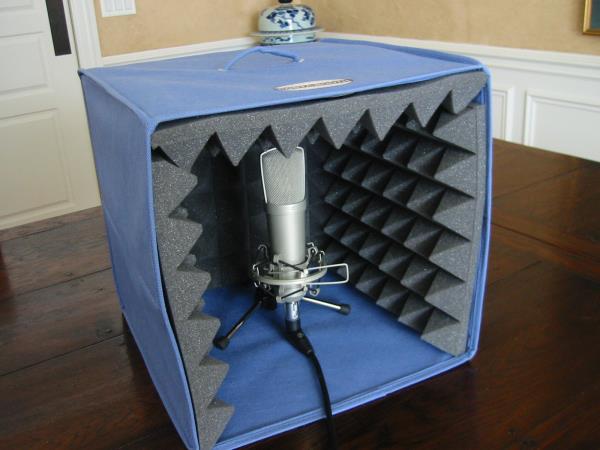
5. Now, for the acoustic treatment. One modification I made is that instead of cutting 3 squares for the two sides and the back, cut one long piece to curve around from one side to the other side. This is to somewhat emulate the shape of the se Reflexion filter. I noticed that when there was too much room in the cube, the sound becomes a little too boomy. Then, fill in the top and bottom with triangular shaped pieces to fill in the gaps. The top part is tricky and I simply used push pins to hold them to the top. There are much better ways to do this part, but this is what I had laying around the home! This is how it should look:


6. Get your beautiful microphone all warm and cozy in this bad boy. Here's my AT4033Cl sipping on a margarita in the foam kingdom.


And there you have it, folks. Cheapest and most effective vocal booth for the home without spending thousands of precious moola on a real vocal booth.
Now you are all wondering, "what does thing thing sound like!???". I know. So, I did a little vocal snippet of a song I was jamming to while making this thing, "Mrs. Officer". Holla back. Keep in mind what I told you about how my room sounds, computer noise, my window wide open, etc. To make things even worst, two cars even drove by my window while I was recording this! But it STILL sounds good :) Enjoy.
Song of the Day: EDX - Casa Grande (Original Mix)
6 comments:
Thank you i found this information very helpful, and yes i must say that is a great sounding booth,and very affordable, now i dnt have to worrie about rearranging my closet lol. i luv music, my sister's and i have our own composition, bt we are finding it, to expensive to go to recording studio. so i desided to do a course and do a lot of research so i can achive this goal, to record our own songs.
so thanks again and i will get started on my portable little booth.
thanks! helpful stuff. I found that acoustic foam sometime drains ambients in vocal booths though some vocalist and engineers find this ideal, some prefer
acoustic panels instead.
__________________
how much did all your materials cost altogether
Seriously, genius! I love the sound you was able to produce using the sound proof box you built. What a concept. When I think of all the money I've spent, you make it so simple. I'm going to give your project a try. Thanks.
Awesome posting, this is really helpful. Thanks for sharing this.
Best regards,
Steffen
Just a quick comment on a bit easier method for the stand.
First, Google "mic stand flange." Buy an $8 flange that screws on to a standard mic stand. Simply cut a piece of plywood 14" x 14", then attach the flange to the center of the wood piece, and screw it on your stand. Provides a perfect platform for the Whitmore cube. Very simple, cheap and easy to disassemble.
Post a Comment